Taking the perfect photo of a young baby with no idea of when to sit or looking at the camera provides a unique set of obstacles to overcome. Although you can manage the setup and photos directly, there are still steps you need to take to make the finished product look as professional as possible. Photographing children can be difficult compared to other forms of photography where an object or an adult object or adults and children can be recorded and submitted at will. While, infants are soft and need to be treated with a lot of care. Also, you need to be patient as there can be many breaks during the photography session to accommodate the different needs of children. So, in the short term during the actual shooting, the images need to be perfect.
Here are a few tips for photography and editing, to help you manage your kids' photos.
Tips for Baby Editing Photos
 |
| #Tips for baby editing photos |
- Use the Macro mode👇
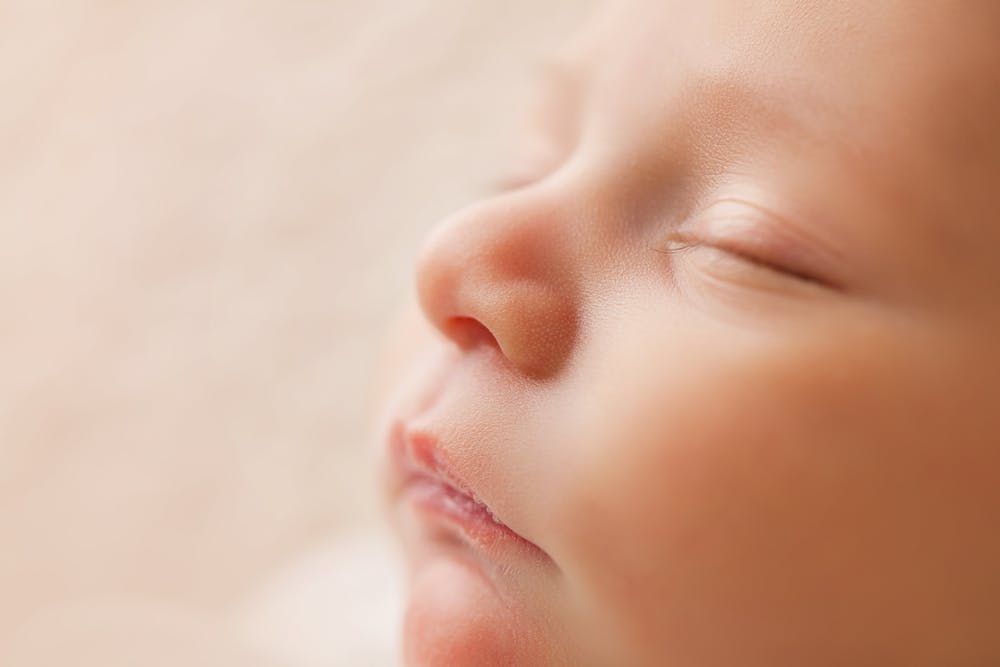
Don't forget to list all those little details that make your baby unique! That little freaked out nose, rosebud lips, his shiny little hook, those little toes and fingers - these are things you will never want to forget as your baby grows. If you have a large lens, now might be the time to remove it from your pocket, wipe it off and use it properly. If you have trouble finding the images you want from your main lens, here are a few tips.
Close it down a bit - if you work as close as you will need to do a great shot, shooting wide open will give you a much smaller depth of field. Unless that's all you need, try shutting down f / 5.6 or higher.
 |
| #tips for baby editing photos |
In addition to shutting down, remove the lens without auto focus and try using Manuel focus. I've had the best results with my macro through manual focus! Don't worry too much about your ISO. If you need to crop it to avoid revealing your photos, don't be afraid to do so.
Try it and have fun! While shooting Gabriel's newborn photos, I kept my macro lens sitting on the table next to me so I could easily rotate the lenses and hold each and every shot of our 'shot.' I found this much easier than trying to find them all at the same time. If you have an extra camera body, you can leave your Macro attached to it to easily capture those macro images as you go.
 |
| #tips for baby editing photos |
Other things to think about shooting with your big lens: nose, lips, eyelids, ears, toes, fingers, belly buttons, hair, and nice shoulders. Those details will change quickly as your child grows up and this is a great way to keep those memories in check.
- Exposure👇
The first thing I do is investigate the exposure of the image as much as possible before the areas look bleeding or Ben's skin or hair begins to disappear because it is too bright. Simple and light.
- Brighten👇
After the exposure is increased, I go ahead and light a little using a light scales. Also, I expand it as much as possible without distorting the image. Surprisingly, this step I love because it illuminates it without making the room / person look crowded, or too bright.
 |
| #tips for baby editing photos |
- Use the Photoshop Airbrush👇
Although all children are flawless in the eyes of their parents, you may need to make a small swipe to make your pictures look like what your clients see in their heads. Most pristine baby pictures are photo-purchased, as children naturally have various skin conditions, scars, bruises, and itchiness that can remove the impact of the image.
Ideally, the photos you give to parents or show them as part of your WordPress portfolio gallery should include some pre-edited images. This will help you capture the unique features of each child in your newborn photos. However, for those flawless shots, try the airbrush tool in Photoshop.
Remember to keep the brush look low to begin with so you can edit the image without making it look too silly. Where nature is better perceived.
 |
| #tips for baby editing photos |
- Adjust the Colours👇
Color picking will hide scratches, spots, and other marks. It can also reduce the appearance of the birth name and create a soft look. Because kids, after all, are cute and soft, removing some color will give you the beautiful image you want. Another way you might want to try is to reduce the colors to the colors but not to the black and white. You have to play this way for a while before using it. If you de-saturate too much, you'll end up with photos that look like something from Victorian times. They will not look natural but they will look unsuccessful. The idea is to soften and give it a different look without going overboard.Patience is the key word in newborn photos. Don't be in a hurry, take your time, and keep learning new ways of photography. I would also like to hear any of the different strategies you use in the comments section below.
- Use the Slider👇
To create a smooth skin tone for your newborn photos, use the precision and contrast slider in Light. If you reduce the contrast to the image, you will get smoother skin, and remove unnecessary spots and shadows. The purpose of most kids' pictures is to create a soft look, instead of harsh or crazy pictures.
Reducing the clarity with a clear slide will also help to create a soft look, but don't go too far. Keep between 10 and 20 ranges.
 |
| #tips for baby editing photos |
-
Special Results👇
Last but not least, this is where the "fun" filters come in, and that's where the small purchases come in. Color Story offers so many creative options over random photos, such as sunspots! Obviously, I'm not going to add sunpots to all of my photos, but if it's a casual photo where the sunspot can work, I like to have fun with this feature. My advice in the first edit would be to be able to edit the image editing part first and keep this step up for a while. After that I will start exploring and having fun with these additional features!If you have any questions please do let me know and i'll be more than happy to answer your questions. Until next time take care guys. Bye:
Comments
Post a Comment
If you have any doubts.
Please let me know!!